Celestron Super Polaris C8 Catadioptric

Review by Steve Smith
 |
|
|
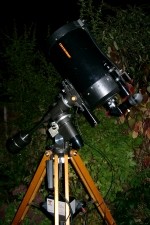
The Celestron Super Polaris C8 Telescope.
|
|
 |
|
|
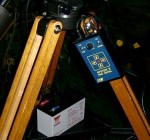
The Vixen drive controller. |
|
My Celestron SPC8 was purchased in 1992. The telescope is an 8" (200mm) f10 Schmidt-Cassegrain with a focal length of 2032mm in its standard configuration. It was supplied with a 30mm eyepiece, a wooden tripod, a Super Polaris mount with RA & DEC drives and a Vixen hand controller. I've added a number of accessories since and I'll describe some of these later.
In general I have found the telescope to be of good quality and it has now served me well for over 10 years. Telescope buying is subject to personal preferences and it is important to consider your individual circumstances and observing interests. The factors that influenced me were:
-
Portability – living near a city I need to travel for dark skies
-
Quick set-up – I have no permanent observatory
-
Suitability for astrophotography & imaging
-
General all-round instrument matching my all-round observing interests.
One weakness I found was the supplied Vixen drive controller. After approximately 6 years I had to replace the hardwired DEC cable due to a poorly designed joint where it enters the hand controller. I also had to replace the red LED as this failed. After approximately 10 years I had to replace the entire controller as it failed and was not economically repairable. I replaced it with an apparently much more sturdy "System 5" unit from AWR Technology but, in fairness, this has not yet had the same test of time.
The system is powered using a 12v 7Ah battery that is recharged using a car battery charger. In theory this should provide enough power for a 7 hour observing session but I've never quite found out.
Strong Points
-
Compact design for its aperture making it very portable.
-
The SCT design with it long focal length provides a high magnification with modest eyepieces.
-
Collimation seems to withstand frequent transportation.
-
Wooden tripod is versatile and can be easily levelled on sloping ground.
-
The wooden tripod damps vibrations quite quickly.
-
The Super Polaris mount makes accurate polar alignment quick and simple.
-
The setting circles on the Super Polaris mount are reasonably big and easy to use.
-
The SCT design is excellent for astrophotography and imaging.
-
The Vixen drives are accurate and do not seem to suffer from large periodic errors.
-
Focussing is very smooth and sensitive compared to other telescopes that I've tried.
Not So Strong Points
-
As with all SCT's planetary images can be slightly lower in contrast than with an equivalent Newtonian due to the relatively large secondary mirror.
 |
|
|
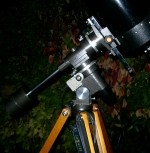
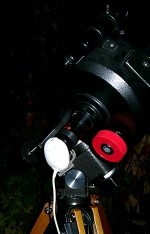
The Super Polaris mount. |
|
-
The wooden tripod and Super Polaris mount are not as sturdy and stable as some other tripod/mount combinations. They are acceptable for an 8" SCT but would probably not be substantial enough for a larger telescope. They are prone to some vibration caused by focussing but the wooden tripod soon damps down this vibration.
-
I'd like a larger finderscope but never have got round to buying one.
-
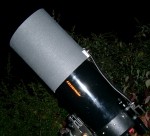
Like all SCT's it suffers from formation of dew on the corrector plate (mainly in spring & autumn). This can be reduced by a home-made dew shield and if necessary removed using a 12v DC warm air blower. Other SCT users have found corrector plate heaters to be effective but they're expensive to buy and I don't have the electrical skills to make my own. To be honest it's not that much of a problem when a 30 second blast of warm air removes any dew.
Must-have Accessories
-
A Celestron f6.3 focal reducer. This provides a wider field of view. With my 30mm eyepiece at f10 the FOV is approximately 45 arcminutes. With the focal reducer the FOV increases to approximately 70 arcminutes. Simply being able to get the whole of the Double Cluster in the FOV made the focal reducer worth every cent (I imported it from the US for $118).
-
Home-made dew shield made from foam plastic (about as wide as the telescope is long and as long as the circumference of the telescope tube) plus a few pieces of Velcro. This prevents the formation of dew unless the telescope is pointed at or near the zenith for too long when the atmosphere is moist and the air cool.
|
|
||||||||
-
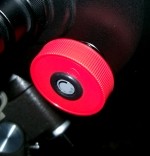
A home-made focus knob enlarger courtesy of Martyn Cole, made from a lid off a Bisto jar and a rubber grommet. Provides greater sensitivity for focussing, particularly useful when webcam imaging. I'd really like an electric focuser but have never felt I could justify the cost – maybe one day I'll figure out how to make one.
-
A range of good eyepieces of course. In addition to the standard 30mm eyepiece I also have 12.5mm and 7.5mm eyepieces in addition to a 2x barlow.
-
A webcam for imaging. I spent a number of years attempting prime focus and eyepiece projection astrophotography. I managed some reasonably satisfying results of deep sky objects with long exposures although these were painfully difficult and time consuming. However I was never happy with planetary or lunar images. With a simple webcam and some great software written by fellow webcam imagers far better results have been achieved much more easily. A selection of images are included in the Gallery here and on My Own Site. incidentally, I'm not too keen on barlow lenses for observing but for webcam imaging of planets one is essential.
Other Accessories
-
I've also added a full aperture glass covered Mylar solar filter from Thousand Oaks. Don't mess around with the Sun, especially with a telescope – these filters only allow one thousandth of 1 percent of the Sun's light through.
-
Light pollution filters. I have the Lumicon Deep Sky and UHC filters. I tend to favour the UHC and in hindsight I would only buy that one of the two. It does increase the contrast significantly when observing emission nebulae but so does using a higher power eyepiece.
General Tips & Comments
When I purchased my telescope, telescopes with computer "GoTo" controls were very expensive (they still are but perhaps the differential is not quite as great). I couldn't afford one but consoled myself with the thought that, even if I could, I'd rather learn my way around the sky and I wouldn't do so if the computer control did everything for me. After more than 10 years, whilst finding objects is not too difficult with the setting circles, I can see the attraction of spending less time locating an object and more time observing it (even if a little satisfaction is lost).
SCT's have closed tubes and take longer than open-tubed telescopes to cool down. Prior to an observing session, as soon as the sun is down put the telescope outside with the rear cover removed and allow it to cool down for at least an hour (more if possible) before any serious lunar, planetary or double star observing.
Many people recommend recollimating your telescope before every use. Personally I find with my telescope the collimation remains reasonably good for a few months. I may attempt recollimation once each observing season. It does pay dividends so maybe I should do it more often but I'm always too impatient to begin observing.
Return to Buying a Telecope section...